Cardiopulmonary resuscitation: instructions for carrying out
How to perform cardiopulmonary resuscitation yourself?
Each of us hopes that he will not have to carry out resuscitation measures or provide emergency medical care to the victim, but no one is immune from such cases.
In emergency situations, first aid must be provided very quickly and correctly. Only then is there a chance for a person to return to life. Although almost all of us have some knowledge regarding first aid, in most cases it is a strange mixture of stereotypes that are completely inapplicable in practice. For example, everyone has an idea of what chest compressions and artificial respiration are. However, not everyone knows in what situation cardiopulmonary resuscitation is necessary and how to carry it out correctly.
What it is? Cardiopulmonary resuscitation is a set of measures aimed at returning a person to life in the event of circulatory or respiratory arrest.
In general, all activities can be divided into two large groups - basic and specialized cardiopulmonary resuscitation (CPR).
Specialized, as the name suggests, is carried out in specialized wards and requires appropriate equipment and medications, as well as education. Here we will consider only basic resuscitation issues.
When is CPR necessary? Indications for CPR: absence of consciousness, breathing, pulse in the carotid arteries, preagonal, agonal states, clinical death.
If the heartbeat is heard, the pulse and breathing are preserved and even quite rhythmic, resuscitation measures are not required.
Basic cardiopulmonary resuscitation includes three stages (ABC):
- ensuring airway patency (A - Airway);
- performing artificial respiration (B - Breathing);
- performing indirect cardiac massage (C - Circulation).
In practice, there is a universal algorithm of actions for sudden death of adults, which includes all these stages in sequence.
Assessing the presence of consciousness in the victim First, it is necessary to assess the presence of injury, especially to the head or neck - if injury is suspected, it is possible to move the victim only if absolutely necessary. After this, you can pat or lightly shake him by the shoulders, while loudly asking a question like: “Are you okay?”
Ensuring airway conduction, assessing spontaneous breathing
First, the victim must be laid flat on his back on a hard, flat surface. At the same time, it must be rotated “as a single whole,” without allowing parts of the body to move relative to each other or rotate.
The second is to empty the mouth of liquid contents (with the index and middle fingers wrapped in a piece of cloth) and solid foreign bodies (with the bent index finger). Then ensure the patency of the upper respiratory tract by throwing back the head and lifting the chin or pushing the lower jaw forward. If there is a suspicion of head or neck injury, only the mandible is moved forward.
Third, put your ear to the victim’s mouth and nose and evaluate the movements of the chest during inhalation and exhalation, the presence of the sound of exhaled air and the sensation of air movement (the assessment should take no more than 10 seconds).
Fourth, if after ensuring the airway is clear, breathing is restored and there are signs of blood circulation, the victim should be turned on his side and his head should be placed so that fluid can flow freely from the mouth.
If there is no breathing, the next stage should begin - artificial respiration. In the absence of special equipment (for example, an Ambu bag), the most effective is mouth-to-mouth breathing, which is carried out immediately after ensuring the airway is open.
The main disadvantage of this method is the presence of a psychological barrier - it is difficult to force yourself to breathe into the mouth or nose of another, sometimes a stranger and stranger, especially if he has previously vomited.
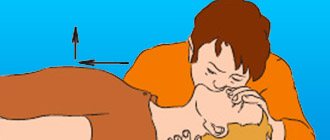
With your left hand, holding the victim’s head in an tilted position, at the same time cover the nasal passages with your fingers to ensure tightness. Next, you need to take a deep breath, wrap your lips around the victim’s mouth, and inhale. Cover your mouth with any clean cloth beforehand for hygienic purposes.
This procedure should be repeated at a frequency of 10-12 breathing cycles per minute (once every 5-6 seconds). Passive exhalation should be complete (time does not matter); the next air injection can be done when the chest has dropped.
The main criterion for the effectiveness of artificial respiration is the movement of the chest during inhalation and exhalation, the sound of exhaled air and the sensation of its movement. If this is not observed, the airway should be re-cleared and the airway should be checked for obstruction (eg by a foreign body) at the level of the larynx.
If signs of spontaneous breathing appear in the victim, artificial ventilation of the lungs is not stopped immediately, it is continued until the number of spontaneous breaths corresponds to 12-15 per minute. At the same time, if possible, synchronize the rhythm of inhalations with the recovery breathing of the victim.
Assessment of blood circulation It is carried out in parallel with artificial respiration - it is necessary to determine the pulsation in the carotid or femoral arteries. Easier and better for sleep - light pressure with two or three fingers in the hole between the lateral surface of the larynx and the muscle roll on the lateral surface of the neck.
In addition, non-professional rescuers are recommended to be additionally guided by indirect signs - breathing, coughing, movements of the victim in response to artificial respiration (the assessment should take no more than 10-15 seconds).
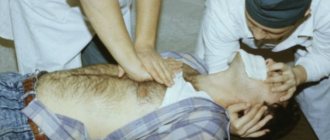
After making sure that the patient has no cardiac activity, it is necessary to begin performing indirect (closed) cardiac massage. The rescuer’s hands are located on the victim’s sternum 2-3 cm above the xiphoid process - the part of the sternum located below the place where the cartilage of the X ribs is attached to it. The hands are placed one on top of the other (“locked”) in the lower third of the sternum.
Before starting chest compressions, you should carry out 2-3 intense blows of air into the victim’s lungs and strike with your fist in the area of the projection of the heart (precordial blow). This is sometimes enough for the heart to “start working” again, while “hitting with all your might” on the sternum is unnecessary and dangerous, you could easily break a person’s ribs. After this, chest compressions begin in the anteroposterior direction by 2.5-5 cm with a frequency of 80-100 times per minute.
The forces are applied strictly vertically to the lower third of the sternum using crossed wrists and arms straightened at the elbows, without touching the chest with the fingers. Compression and cessation of compression should take equal time; when the compression stops, the hands do not leave the chest.
Simultaneous artificial respiration and closed cardiac massage If spontaneous breathing is absent during the first examination, two breaths are first taken, and their effectiveness is simultaneously assessed.
Then, if one person is performing resuscitation, 15 chest compressions should be alternated with two breaths, if two people - 5 chest compressions should be alternated with one breath, stopping chest compressions for 1-2 seconds while blowing air into the lungs.
Mouth-to-mouth breathing is dangerous for the rescuer and can cause infection. It is believed that indirect cardiac massage can be performed without artificial ventilation of the lungs - if there are no special devices for artificial respiration: an Ambu bag, a ventilator, etc. However, this technique is less effective, and if possible, you should still opt for artificial respiration.
Monitoring the victim's condition during resuscitation After every 4 cycles of artificial respiration and chest compressions, you need to check the pulse in the carotid artery (within 3-5 seconds). If a pulse appears, chest compressions should be stopped and spontaneous breathing assessed.
If it is absent, you need to continue artificial respiration while simultaneously determining the pulsation in the carotid artery after every 10 blows of air into the lungs.
When spontaneous breathing is restored and there is no consciousness, it is necessary to maintain the patency of the upper respiratory tract and carefully monitor the presence of breathing and pulsation in the carotid artery until the arrival of the resuscitation team.
Irreversible changes in the brain occur 3-4 minutes after circulatory arrest, which is why early help and the start of resuscitation measures are of great importance. Refusal to use resuscitation measures or their cessation is permissible only if biological death is established or these measures are recognized as absolutely futile.
In parallel with resuscitation efforts (without interrupting them), you need to call an ambulance and diagnose the victim’s condition.
Basics of cardiopulmonary resuscitation. Asphyxia, drowning, electrical trauma.
BASICS OF CARDIOPULMONARY RESUSCITATION
Cardiopulmonary resuscitation (CPR) is a set of emergency measures aimed at restoring the body’s vital functions and bringing it out of a state of clinical death.
Having discovered a victim while extinguishing a fire or eliminating an emergency, a firefighter or rescuer must first of all diagnose the person being rescued.
Determine whether the victim is unconscious:
- lies motionless;
- does not answer questions;
- does not respond to surrounding impulses (call, touch).
Next, it is necessary to take measures to assess the situation and ensure safe conditions for providing first aid:
- identify threatening factors for your own life and health and/or threatening factors for the life and health of the victim (exposed wires, spilled flammable or explosive liquids, parts of building structures threatening to fall, unbreathable atmosphere, unstable emergency vehicle, etc.);
- eliminate threats to life and health;
- stop the effect of damaging factors on the victim (move the victim to a safe place);
- Determine the presence of breathing using hearing, vision and touch: look for chest movements, listen to breathing sounds from the victim’s mouth, feel the exhaled air on your cheek for no more than 10 seconds;
- Determine the presence of blood circulation - checking the pulse in the main arteries for no more than 10 seconds.
Identify signs of biological death:
- clouding and drying of the cornea;
- the presence of a symptom of “cat’s eyes” - when the eye is compressed, the pupil is deformed and resembles a cat’s eye;
- coldness of the body and the appearance of cadaveric spots (blue-violet spots appear on the skin; when the corpse is positioned on the back, they appear in the area of the lumbar shoulder blades, buttocks, and when positioned on the stomach - on the face, neck, chest, abdomen);
- rigor mortis occurs 2 to 4 hours after death.
| Attention!!! | ||
| Determine the presence of a pulse in the carotid artery. (There is a pulse - the victim is alive.) | Listen to breathing, determine the presence or absence of chest movements. (There is movement of the chest - the victim is alive.) | Determine the reaction of the pupils to light by lifting the upper eyelid of both eyes. (The pupils narrow in the light - the victim is alive.) |
CARRYING OUT CARDIOPULMONARY RESUSCITATION
Measures to restore airway patency:
- place the victim on his back, without raising his head, on a flat, hard surface;
- throw back your head with a lift of the chin - one hand is placed on the forehead and gently tilts the head back, the fingertips of the other hand are placed under the chin or neck and gently pull up;
- push the lower jaw forward and upward - four fingers are placed behind the angle of the lower jaw and pressure is applied upward and forward, using the thumbs, the mouth is opened slightly by moving the chin slightly;
- It is strictly forbidden to throw back your head if you suspect a cervical spine injury.
| Attention!!! | |
| Ensure patency of the upper respiratory tract. Using gauze (handkerchief), remove mucus, blood, and other foreign objects from the mouth using a circular motion of your fingers. | Tilt the victim's head back. (Lift your chin while holding the cervical spine.) Do not perform if a fracture of the cervical spine is suspected! |
| Pinch the victim's nose with your thumb and forefinger. Using a device for artificial ventilation of the lungs of the “mouth-device-mouth” type, seal the oral cavity, make two maximum, smooth exhalations into his mouth. Allow two to three seconds for each passive exhalation of the victim. Check whether the victim’s chest rises when inhaling and falls when exhaling. |
Measures to carry out cardiopulmonary resuscitation until signs of life appear (in the absence of adequate breathing and pulse):
- perform indirect cardiac massage;
- perform artificial respiration “Mouth to mouth” or artificial respiration “Mouth to mouth”, “Mouth to nose” using an artificial respiration device;
- alternate a series of massage pushes with artificial breaths in the ratio of 30 pushes: 2 breaths .
It is necessary to continue chest compressions and artificial ventilation until the ambulance arrives or until the victim shows signs of life.
Giving the victim an optimal body position: when signs of life appear and there is no consciousness, transfer the victim to a lateral stable position.
Next, monitor the victim’s condition (consciousness, breathing, blood circulation).
Upon arrival, transfer the victim to the emergency medical team.
TECHNIQUE FOR CARDIOPULMONARY RESUSCITATION
Indications for cardiopulmonary resuscitation:
- presence of signs of clinical death (lack of breathing, carotid pulse, consciousness);
- agonal breathing (rare weak sighs or rare noisy labored breathing), manifests itself in the first few minutes after loss of consciousness during sudden cardiac arrest in adults.
IMPORTANT!:
- do not wait for adults to completely stop breathing; if there is any doubt, begin CPR;
- if there is any doubt about the presence of a pulse and there are no other signs of life (response to a call, spontaneous breathing, coughing or movement), begin cardiopulmonary resuscitation.
Method of performing indirect cardiac massage:
- the victim must lie on a flat, hard surface;
- hand placement point: for adults - in the center of the chest, 2 transverse processes above the base of the xiphoid sternum, for children under 1 year - 1 finger below the nipple line;
- press on the point with the heel of your palm, place your other hand on top, fingers of your palms pointing upward; for children under 1 year - two fingers;
- straighten your elbows, hang over the victim, apply pressure strictly vertically;
- perform 30 strong and fast rhythmic thrusts with a depth of pressure of 5-6 cm; for children under 1 year - by 3-4 cm or 1/3 of the diameter of the chest and with a frequency of compressions on the chest of 100 per minute;
- ensure that the chest is straightened after each compression to fill the heart with blood, ensuring that the duration of chest compression and decompression is approximately the same;
- Constantly adjust the pressure point;
- perform alternately if resuscitation is provided by 2 firefighters or rescuers (every 2 minutes or every 5 cycles of cardiopulmonary resuscitation, the firefighter or rescuer performing chest compressions must be changed; the change of firefighters / rescuers should not take more than 5 seconds).
Method of performing artificial lung ventilation:
- Use the index finger and thumb of one hand to pinch the victim’s nose, and support his chin with the fingers of the other hand;
- take a (shallow) breath, tightly wrapping your lips around the patient’s mouth (“kiss of life”), and exhale;
- keeping your head thrown back and your jaw extended, remove your lips so that air can passively escape from the victim’s respiratory tract;
- perform a second exhalation and return to chest compressions;
- carry out air injection for 1 s, observing the visible excursion of the chest. The exhalation should not be too large or sharp. The volume of blown air should be 500 - 600 ml;
- avoid exceeding the frequency, force or volume of air injections, but at the same time strive to perform artificial respiration as quickly as possible in order to minimize pauses in chest compressions;
- use barrier devices (face mask, respiratory protection devices for the resuscitator, air duct) that reduce the risk of disease transmission during mouth-to-mouth artificial respiration;
- in the first minutes, use protective devices that are at hand and allow you to avoid direct contact, for example a gauze mask;
- use a breathing bag (it is preferable for 2 people to work with the breathing bag: one presses the face mask and holds the patient’s airways open - throwing back the head, extending the jaw, the other compresses the bag, ventilating the patient’s lungs, thus achieving better sealing);
- For children under 1 year of age, artificial ventilation should be performed “mouth to nose and mouth.”
Criteria for stopping cardiopulmonary resuscitation:
- the appearance of independent pulse and breathing;
- transfer of the victim to an emergency medical team;
- a doctor's declaration of biological death;
- if resuscitation measures are ineffective within 30 minutes. (the skin does not turn pink, the pupil does not react to light, there is no pulsation of the carotid arteries in time with massage shocks).
Criteria for not performing cardiopulmonary resuscitation:
- the onset of clinical death due to incurable consequences of acute injury incompatible with life (by doctor’s decision);
- It is reliably known that death occurred more than 30 minutes. back (exception - drowning in cold water);
- presence of reliable signs of biological death.
| Attention!!! | |
| Determine the location of the xiphoid process, as shown in the figure. | Determine the point of compression two transverse fingers above the xiphoid process, strictly in the center of the vertical axis. |
| Place the heel of your palm on the compression point. | Apply compressions strictly vertically along the line connecting the sternum to the spine. Perform compressions smoothly, without sudden movements, using the weight of the upper half of your body. |
| - For infants, massage is performed using the palmar surfaces of the second and third fingers; - for teenagers - with the palm of one hand; - in adults, the emphasis is placed on the base of the palms, the thumb is directed towards the head (legs) of the victim. The fingers are raised and do not touch the chest. |
| Alternate two “breaths” of artificial pulmonary ventilation (ALV) with 30 pressures, regardless of the number of people performing resuscitation. | Monitor the pulse in the carotid artery, the reaction of the pupils to light (determining the effectiveness of resuscitation measures). |
ERRORS WHEN CARRYING OUT CARDIOPULMONARY RESUSCITATION
Errors during artificial ventilation (artificial respiration):
- complete patency of the airways is not ensured;
- tightness is not ensured when air is blown using the “mouth to mouth” or “mouth to nose” method;
- air enters the stomach, which leads to its distension, followed by vomiting (regurgitation);
- the sequence of air injection and pressure on the chest during external cardiac massage is disrupted (inspiration during pressure).
Mistakes when performing external cardiac massage:
- the victim is laid on a springy surface;
- the position of the hands of the person providing assistance differs from the “standard” one;
- when performing a cardiac massage, the arms are bent at the elbow joints or lifted from the victim’s sternum;
- Very sharp pressure is applied to the sternum, which can lead to fractures of the ribs or sternum with damage to the lungs and heart. If excessive pressure is placed on the xiphoid process of the sternum, ruptures of the stomach and liver are possible;
- the required frequency of pressure on the sternum is not provided (60 pressures per 1 minute is the minimum, 80-100 are optimal values) or rhythm (long breaks are allowed);
- there is no control over the effectiveness of the massage (checking the pulse every 2-3 minutes) and the ratio of the frequency of pressure on the sternum and air blowing (30:2).
Features of resuscitation in children:
- when performing artificial respiration on a child, it is necessary to blow air into the victim’s respiratory tract simultaneously through the mouth and nose, tightly covering them with the lips;
- exhale into the child’s airways less sharply than for an adult;
- Unlike adults, in whom artificial respiration is carried out at a frequency of 12 blows per 1 minute, when providing assistance to children under 2-3 years of age, 20 blows per 1 minute are performed, and at an older age - 15 blows per 1 minute;
- external cardiac massage should be carried out not with two, but with one hand, in infants (up to 1 year) - with the tips of two fingers, index and middle, with a frequency of 100-120 pressures per 1 minute. The point of application of pressure is 1 finger below the line connecting the nipples.
PROCEDURE FOR PROVIDING FIRST AID TO VICTIMS UPPER RESPIRATORY TRACT OBTURATION BY A FOREIGN BODY (ASSHYXIA)
Asphyxia is oxygen starvation of the body and excess carbon dioxide in the blood and tissues, for example, when the airways are compressed from the outside (suffocation), their lumen is closed by edema, or pressure drops in the artificial atmosphere (or respiratory system).
The first step is to quickly diagnose the victim. Examination of the victim to determine the degree of airway obstruction:
- partial obstruction : paroxysmal cough, noisy breathing, hoarseness of voice (up to complete disappearance), signs of respiratory failure (bloating of the wings of the nose, retraction of intercostal spaces, bluish skin and visible mucous membranes), restless behavior of the victim;
- complete obstruction : cannot speak, breathe or cough, motor agitation, rapid onset of loss of consciousness, bluish face.
First aid for asphyxia
It is necessary to take measures to restore airway patency:
When providing assistance to a conscious victim:
- tilt the victim forward;
- apply 5 sharp blows with the heel of your palm between the shoulder blades;
- if the obstruction is not eliminated, perform five subdiaphragmatic thrusts (Heimlich maneuver);
- alternate five blows to the back with five subdiaphragmatic thrusts until the obstruction is eliminated.
Method of performing subdiaphragmatic thrusts (Heimlich maneuver):
- stand behind the victim, grab him around the waist, bend him slightly forward;
- clench one hand into a fist, place it below the sternum and above the victim’s navel;
- grab the clenched fist with your other hand;
- pull sharply and forcefully upward.
The mechanism for performing subdiaphragmatic thrusts (Heimlich maneuver) in a pregnant woman, an obese victim, victims with an abdominal wound:
- place your hands at the base of the sternum (directly above the attachment of the lower ribs);
- perform the technique with a quick push, pressing hard on the chest.
When providing assistance to an unconscious victim:
- place the victim on the floor in a supine position;
- clear the airways;
- place one hand with the heel of the palm between the navel and costal arches, place the second hand on top;
- using your body weight, press on the victim’s stomach in an upward direction towards the diaphragm; repeat several times until the airways are cleared;
- if there is no effect, follow the cardiopulmonary resuscitation algorithm.
| Attention!!! | |
| Place the baby on the forearm of your left hand, and clap the palm of your right hand 2-3 times between the shoulder blades. Turn the baby upside down and pick him up by the legs. | Grab the victim from behind with your hands and clasp them in a “lock” just above his navel, under the costal arch. Press sharply with force - with your hands folded into a “lock” - into the epigastric region. Repeat the series of pressures 3 times. For pregnant women, apply pressure to the lower parts of the chest. |
| If the victim is unconscious, sit on top of the hips and sharply press on the costal arches with both palms. Repeat the series of pressures 3 times. | Remove the foreign object with your fingers wrapped in a napkin or bandage. Before removing a foreign body from the mouth of a victim lying on his back, he must turn his head to the side. |
PROCEDURE FOR PROVIDING FIRST AID TO DROWNING VICTIMS
Drowning is a death or pathological condition resulting from immersion of the body in water or other liquids and bulk materials) and asphyxia.
All actions of a firefighter or rescuer always begin with the fastest but high-quality diagnosis of the victim.
Measures to examine the victim:
- determining the presence of breathing using hearing, vision and touch;
- determining the presence of blood circulation, checking the pulse in the main arteries.
Examination of the victim to determine the type of drowning:
True (blue) drowning caused by water entering the victim’s lungs:
- the victim's face and neck are blue-gray;
- copious pinkish foam is released from the mouth and nose;
- swollen neck vessels.
Spastic (pale) drowning - the access of air to the lungs is stopped due to spasm of the larynx:
- the skin of the victim is pale gray;
- little or no foaming from the mouth and nose.
Syncopal drowning . With this type of drowning, a reflex cessation of blood circulation occurs in victims caught in cold water:
- pale skin;
- independent breathing and blood circulation are absent.
First aid for drowning
Remove the victim to the shore or boat. Next, it is necessary to take measures to restore airway patency.
In case of true drowning:
- turn the drowned person over onto his stomach, create an angle between the chest and pelvis (bend him over the knee, place a support under his stomach, bend him over his arms or turn him face down, raise the pelvis 40 cm from the ground);
- induce a gag reflex by pressing your fingers on the root of the tongue;
- continue to perform this technique until the end of water discharge from the mouth;
- clean your mouth.
For spastic and syncope drowning:
- throw back your head with your chin up;
- extend the lower jaw;
- clean the oral cavity of foreign bodies.
| Attention!!! | |
| Make sure you are not in danger. Remove the victim from the water. (If you suspect a fracture of the spine, pull the victim out on a board or shield.) | Lay the victim on his stomach on your knee, let the water drain from the respiratory tract. Ensure patency of the upper respiratory tract. Clear the oral cavity of foreign objects (mucus, vomit, etc.). |
If there is no spontaneous breathing, immediately begin cardiopulmonary resuscitation measures:
- hand pressure on the victim’s sternum;
- mouth-to-mouth artificial respiration;
- mouth-to-nose artificial respiration;
- artificial respiration using an artificial respiration device.
Measures to maintain airway patency:
- giving a stable lateral position;
- insertion of an oropharyngeal airway.
Next, measures are taken to warm the victim, give the victim an optimal body position and monitor the victim’s condition (consciousness, breathing, blood circulation).
If pulmonary edema occurs (bubbling breathing, cough with foamy sputum):
- create an elevated torso position or a sitting position;
- lower your legs;
- apply venous tourniquets (tight bandaging) to the base of the thighs;
- inhale ethyl alcohol vapor.
Transfer the victim to the emergency medical team.
FIRST AID FOR ELECTRICAL INJURIES
Electric shock is one of the most dangerous domestic and industrial accidents and is always associated with high mortality. The effect of electric current on the human body leads to strong heating of tissues and the development of burns, as well as disruption of the functioning of internal organs.
First aid for an electric shock consists of stopping the effect of the electric current on the victim’s body, performing a closed heart massage and artificial respiration if the victim’s heart has stopped due to an electric shock, treating and applying a bandage to the burned areas.
Electrical injury usually occurs as a result of exposure of the tissues of the human body to high-power household electric current or a discharge of atmospheric electricity (lightning).
Sources of electric shock are:
- faulty electrical equipment in enterprises and household electrical appliances,
- broken wires of high-voltage lines,
- failure to comply with safety regulations when working with electrical equipment.
The degree of influence of electric current on the human body is determined by the voltage and current strength, the way the current passes through the body, the general health of the victim and how timely first aid was provided.
Features of electric shock and electrical injury
Electric current, when passing through the human body, causes tissue heating and can lead to electrical burns to the skin and damage to underlying tissues and organs.
Electrical burns occur where electrical current enters and exits and are called “current marks.”
Electrical burns may seem minor in appearance, but in fact they are often deep with significant damage to muscles, bones and internal organs.
Electric current can disrupt the functioning of the heart, even causing it to stop.
A victim of an electric shock may stop breathing.
Signs and symptoms of electrical shock:
- Finding an exposed source of electric current near the victim;
- The victim is unconscious;
- Obvious burns on the surface of the skin;
- Breathing problems with possible respiratory arrest;
- The pulse is weak, arrhythmic or absent;
- The entrance and exit holes of the electrical charge are usually located on the hands or feet.
Due to the nature of electrical trauma, even with short-term exposure to electric current, the victim may experience respiratory and cardiac arrest. Therefore, sufficiently effective first aid for electric shocks at the scene of an accident is often a decisive factor in saving the victim.
First aid for electric shock:
Assess the situation. Do not touch the victim immediately. He may still be under electrical current. If you touch the victim, you can get hit. If possible, you need to turn off the power source (unscrew the plugs, turn off the switch). If this is not possible, then move the current source away from yourself and the victim with a dry, non-conducting object (branch, wooden stick, etc.).
If it is necessary to pull the victim away from the electrical wire, we must remember that the human body through which the current has passed conducts the current in the same way as the electrical wire. Therefore, you should not touch open parts of the victim’s body with your bare hands; you can only touch dry parts of his clothing, and it is better to wear rubber gloves or wrap your hands in dry silk cloth.
| Attention!!! | |
| Ensure your safety. Put on dry gloves (rubber, wool, leather, etc.) and rubber boots. If possible, turn off the power source. When approaching the victim on the ground, walk in small steps, no more than 10 cm. | Remove the wire from the victim with a dry, non-conductive object (stick, plastic). Drag the victim by his clothes at least 10 meters from the point where the wire touches the ground or from live equipment. |
After the electric current ceases, it is necessary to pay attention to the presence of signs of life (breathing and pulse in large vessels).
In the absence of signs of breathing and pulse, urgent resuscitation measures are necessary: closed heart massage and artificial ventilation (artificial respiration). Inspect exposed areas of the victim's body. Always look for two burns (where electrical current enters and exits). Place a sterile or clean cloth over the burned areas. Do not use a blanket or towel for this purpose - fibers from them may stick to the burned surface. To improve the functioning of the heart, blood flow to it should be increased. To do this, lay the victim so that his chest is slightly lower than his legs.
All victims of electric shock should be hospitalized as quickly as possible.
Medical products that may be needed when providing first aid to victims :
- Isothermal rescue blanket.
- Sterile wipe.
- Glasses or eye protection.
- Non-sterile medical examination gloves.
- Oropharyngeal airway.
- Transport shield.
- Soft frameless medical stretcher.
- Vacuum stretchers.
- Devices for respiratory protection of the resuscitator.
- Face mask
- Breathing bag
