Features and advantages of vacutainers
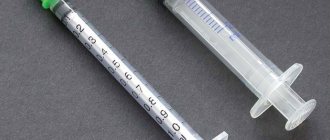
The three-component system for venous blood collection consists of:
- sterile vacuum tube with preservative;
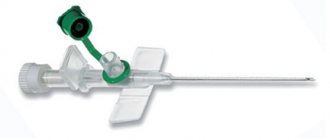
- double-sided automatic needle for intravenous injection;
- automatic needle holder.
The advantages of negative pressure systems are related to their design features:
- safety, sterility and guarantee of sample integrity;
- minimizing microclots and hemolysis;
- maintaining a constant time between collection and connection with the additive;
- exact ratio of sample and additive;
- minimizing the tourniquet effect.
No needle visible - no fear
Not long ago, disposable lancets of a new modification appeared: a thin needle is invisible before and after the puncture. She hides comfortably in the capsule, and a person, without seeing her, does not experience psychological discomfort. Pain during blood sampling from a finger is minimal, the wound surface is small, and it heals much faster than when using standard needles.
The sterile needle in the lancet is automatically returned to the capsule immediately after use. It is impossible to inject yourself accidentally, which means you cannot become infected with blood-borne infections. It is also impossible to use again - a hidden lock prevents the needle from coming out again. This solves another issue – safe disposal. Similar lancet needles are also used to take blood from a baby’s heel.
Algorithm for taking blood using a vacuum system
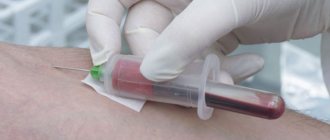
The method of collecting venous blood with vacuum tubes is similar to using a syringe, but provides greater safety, efficiency and convenience. The collection is carried out quickly, which is important to guarantee an accurate research result.
When collecting blood from a peripheral vein using a vacuum system, you will need:
- vacuum tubes;
- tourniquet;
- cotton wool (cotton swabs) or napkins;
- antiseptic (medicinal alcohol);
- bactericidal patch;
- sterile medical tray;
- medical clothing (gown, goggles, mask and gloves).
Before the procedure, it is necessary to fill out a patient referral, treat your hands with a special solution, and put on protective medical clothing.
Technique for collecting blood from a vein
- Prepare test tubes that correspond to the stated tests or laboratory tests required by the patient, a needle, a holder, alcohol wipes or a cotton swab, and a patch.
- Place a tourniquet on the patient's shirt or diaper 7-10 cm above the venipuncture site. Ask the patient to make a fist.
- Select a venipuncture site. The middle ulnar and saphenous veins are the most commonly used, but smaller and more plethoric veins of the dorsum of the wrist and hand can also be punctured.
- Take the needle and remove the cap from the rubber membrane side. Insert the needle into the holder and screw it in until it stops.
- Disinfect the venipuncture site with a gauze pad. You must wait until the antiseptic solution has completely dried.
- Remove the protective cap on the other side. Insert the holder-needle vacuum system into the vein in accordance with the algorithm for conventional blood collection using a syringe. Make sure that the needle is cut upward at an angle of 15º relative to the surface of the skin. Since the other end is covered with a membrane, blood does not flow through the needle. Using smooth and quick movements, the skin and vein wall are punctured. Deep immersion of the needle should be avoided.
- Insert the test tube as far as it will go into the holder. As a result, the needle pierces the membrane and the plug, and a channel is formed between the vacuum tube and the vein. The needle should not be moved when blood begins to flow. The process continues until the vacuum in the test tube is compensated.
- The tourniquet should be removed or loosened as soon as blood begins to flow into the vacutainer. Make sure the patient unclenches their fist.
- After the blood flow stops, the tube is removed from the holder. The membrane returns to its original position, the blood flow through the needle is blocked. If necessary, other tubes can be connected to the holder to collect the required volume of blood. Immediately after filling, the test tube must be carefully inverted to mix the sample with the filler: test tube without anticoagulants - 5-6 times; test tube with citrate - 3-4 times; test tube with heparin, EDTA and other additives - 8-10 times.
- After filling the last tube, disconnect it from the holder and remove the holder-needle system from the vein. To ensure safety, remove the needle from the holder and place it in a special container for disposal.
- A sterile napkin/cotton ball moistened with an antiseptic is applied to the puncture site, or a bactericidal patch is applied.
- The tubes are labeled and placed in a special container for transportation to the laboratory.
How to prepare for the procedure?
The blood collection algorithm requires special preparation for the event. The reliability of the analysis results is influenced by the following factors:
- time of collection of biological fluid;
- food intake, the nature of foods in the diet;
- drinking alcoholic beverages, smoking;
- taking medications;
- physiotherapy;
- intense physical activity;
- stressful situations;
- instrumental diagnostic methods (MRI, ultrasound, x-ray);
- cyclical changes in a woman’s body (mensis).
Before taking blood from a vein, you should adhere to general rules that will increase the efficiency of the study and minimize the risk of obtaining false results.
- Blood is donated on an empty stomach in the morning (8.00 – 11.00). You can drink water without carbon dioxide.
- On the eve of the examination, it is not recommended to overeat, eat salty, spicy, or fatty foods.
- The day before the test, avoid drinking alcohol.
- It is necessary to submit biomaterial before undergoing instrumental examination and physiotherapeutic treatment.
- Coordinate the discontinuation of medications with your doctor.
- One hour before the examination, you should not smoke; it is necessary to exclude stressful situations and physical overexertion.
Repeated blood tests to monitor indicators over time should be carried out under the same conditions (time, diet) and in the same laboratory, since the blood sampling algorithm, study methods and reference values (norms) may differ significantly in different medical institutions.
Possible errors when using vacuum tubes
| Problem | Possible reasons | Solution |
| Blood does not flow into the tube after connecting to the holder | The needle did not enter the vein | In all of these cases, it is necessary to carefully adjust the position of the needle. There is no need to disconnect the tube from the holder if there is no need to remove the needle and under the skin. |
| The tip of the needle rests against the venous wall | ||
| The vein is pierced through | ||
| The blood in the test tube was received in less quantity than required for the analysis. | The venous vessel collapsed due to low pressure | It is necessary to disconnect the tube from the holder and wait a while until the vein is filled again |
| The system needs to be replaced and the procedure repeated | Air got into the test tube |
You can order high-quality laboratory consumables. When collecting blood using a vacuum system, follow the algorithm. This will ensure the safety of the procedure and the reliability of the research results.
Venous blood collection
See Necessary equipment for collecting venous blood
Preparing the patient for the blood donation procedure
- Preparation may vary depending on the analysis. For each specific analysis, if necessary, information can be obtained from the laboratory.
- Blood sampling occurs in the morning before 12.00, preferably between 8.00-10.00.
- Before the blood collection procedure, the patient must remain awake for at least 1 hour.
- On the day before the test, the patient can drink and eat as usual, but should only limit the consumption of alcohol, coffee and fatty foods.
- At least 10-14 hours should pass between the last meal and fluid intake and the blood draw. If necessary, you can drink no more than one glass of water without any additives.
- Before drawing blood you should avoid: Excessive physical and emotional stress
- Taking medications (if possible)
- Alcohol consumption
- Smoking
It is important to know
- The vacuum tube should be filled strictly to the specified volume to ensure the correct ratio of blood and additive - the blood in the tube should not be less than the specified volume (dilution effect) or more (danger of clotting).
- When drawing blood, you should hold the tube in such a position that the blood flows along the wall of the tube. If blood splashes onto the bottom of the tube and forms foam, it may promote hemolysis.
- Test tubes containing an anticoagulant must be turned upside down immediately after filling so that the blood mixes with the anticoagulant - at least 4 times when taking blood clotting tests, in all other cases 8 times. The air bubble should move from one end of the tube to the other. The test tube must not be shaken or shaken!
- If blood does not flow into the tube or the flow stops before the tube is filled, the cause may be a failed venipuncture or the vessel wall being sucked into the needle hole.
- Solution: change the position of the needle - insert the needle a little deeper, pull it back, change the angle at which the venipuncture was performed. If venipuncture is unsuccessful, another blood vessel should be punctured. Repeated puncture of the same vessel should be avoided.
- If there is enough blood in the yellow cap tube (serum tube) for testing, but the vacuum tube is not filled to the required volume, hemolysis may occur due to the remaining vacuum in the tube. To avoid this, quickly remove the stopper from the test tube to allow air to enter the test tube and close with a new stopper. The remaining tubes cannot be used if they are insufficiently filled.
- When drawing blood, do not rub or pat the intended puncture site. Excessively strong hand pumping can cause hemolysis and hemoconcentration.
- After disinfecting the skin, it should be allowed to dry so that particles of the disinfectant, which promote hemolysis, do not enter the test tube through the needle.
- Apply a tourniquet approximately 10-12 cm up from the puncture site. The tension of the tourniquet should be such that a finger can be placed between the tourniquet and the skin.
- Immediately loosen the tourniquet, making sure that blood flows into the tube.
- When drawing blood, it is important that the time the tourniquet compresses the blood vessels is minimal. Keeping the tourniquet in place for up to 1 minute does not particularly affect routine studies performed on blood serum.
- As a rule, blood is drawn in the elbow from the central vessel. For the patient, the elbow is less painful to pierce with a needle because the blood vessel is close to the skin. Alternative sites for venipuncture may include the inner forearm, wrist, and dorsum of the hand.
- Venipuncture/blood sampling is not performed: from an extensive scar surface, from a wound surface (burn wound), from an edematous surface, from a surface with a hematoma, from a cannulated vein, from a limb (arm) with a fistula for dialysis.
Venous blood collection procedure
1. Identify the patient. 2. Complete/check directions. 3. Find out whether the patient followed the prescribed diet and whether he is allergic to substances contained in the disinfectant for cleansing the skin at the venipuncture site. 4. Provide the patient with a comfortable and suitable position for drawing blood - the patient’s arm should be extended so that the arm forms a straight line from the shoulder to the wrist. 5. Wear gloves. 6. Prepare the necessary test tubes - shake them lightly to remove possible droplets of additives from the stopper. The test tubes will be installed in the required order. 7. Select a puncture needle of the required diameter and make sure that the needle is stable at the attachment point. Make sure that the protective cap does not interfere with vein puncture. 8. Select the puncture site. Ask the patient to clench his hand into a fist so that the veins are better visible. 9. Clean the site of the intended puncture with a disinfectant and allow the skin to dry. 10. If necessary, apply a tourniquet to your arm. 11. Remove the protective cap from the needle. Check whether the needle hole is free. 12. Perform a vein puncture - to do this, fix the vein with your finger slightly lower from the puncture site and slightly stretch the skin so that the vein does not move; Use a needle to pierce the vein wall at an angle of 15-30 degrees, the hole of the needle should be directed upward. 13. When drawing blood, make sure that the stopper of the tube is located higher and the bottom lower, to avoid substances from the test tube getting into the needle. 14. Holding the needle attachment point firmly with one hand, place the vacuum tube as close as possible to the needle attachment point so that the tip of the needle, covered with a latex cap, passes through the tube stopper. 15. The test tube should be held so that the blood flows down the wall of the test tube. 16. Immediately loosen the tourniquet, making sure that blood flows into the test tube. 17. When the test tube is filled with the required amount of blood and blood stops flowing into the test tube, remove the test tube from the mount and, if necessary, place the next test tube there. 18. Immediately after filling, the test tube with additives should be turned upside down and back again 4-5 times with calm movements so that the blood is mixed with the additives. 19. Place a dry cloth at the puncture site and remove the needle from the vein. 20. After use, immediately close the needle with a protective cap. To do this, you need to push the protective cap onto the needle with your finger. 21. Press the puncture site with a napkin for 3-5 minutes, the patient’s arm should be straightened. If necessary, apply a bandage to the puncture site. 22. Label the test tubes. 23. With calm movements, turn the test tube upside down and back again 4-5 times. Place the test tubes on a stand in a vertical position. 24. Dispose of the used needle and needle holder in an appropriate waste container.